Support Centre
We Are Here to Help: Answering Your Frequently Asked Questions
Dashboard Docs
Get to know your Dashboard and other essentials
Signing up
Signing up is quick and easy! Here’s a step-by-step guide on how to create your account:
1. Visit our website: Head to our website using your preferred web browser.
2. Locate the Sign-Up Button: Look for the “Sign Up” or “Create Account” button on the homepage. It’s usually prominently displayed and easily identifiable.
3. Fill out the Registration Form: Click the Sign-Up button to be redirected to a registration form. Provide the required information, such as your name, email address, and password. Make sure to choose a strong password to ensure the security of your account.
4. Verify Your Email: After submitting the registration form, you will receive an email at your provided address. Open the email and click on the verification link to confirm your account. This step helps us ensure the validity of your email address.
5. Explore Your Account: You’re ready to go once verified! Log in to your newly created Dotin account and explore the various features and functionalities. Familiarise yourself with the user interface and use the resources to help you navigate the Dashboard effectively.
That’s it! You’re now officially a member of Dotin and ready to start creating detailed property inspection reports. Enjoy the benefits of your free account and make the most out of our services. To maximise your free account, visit our image optimisation settings. Our support team is always ready to assist you with questions or issues during sign-up. Happy Dotin!
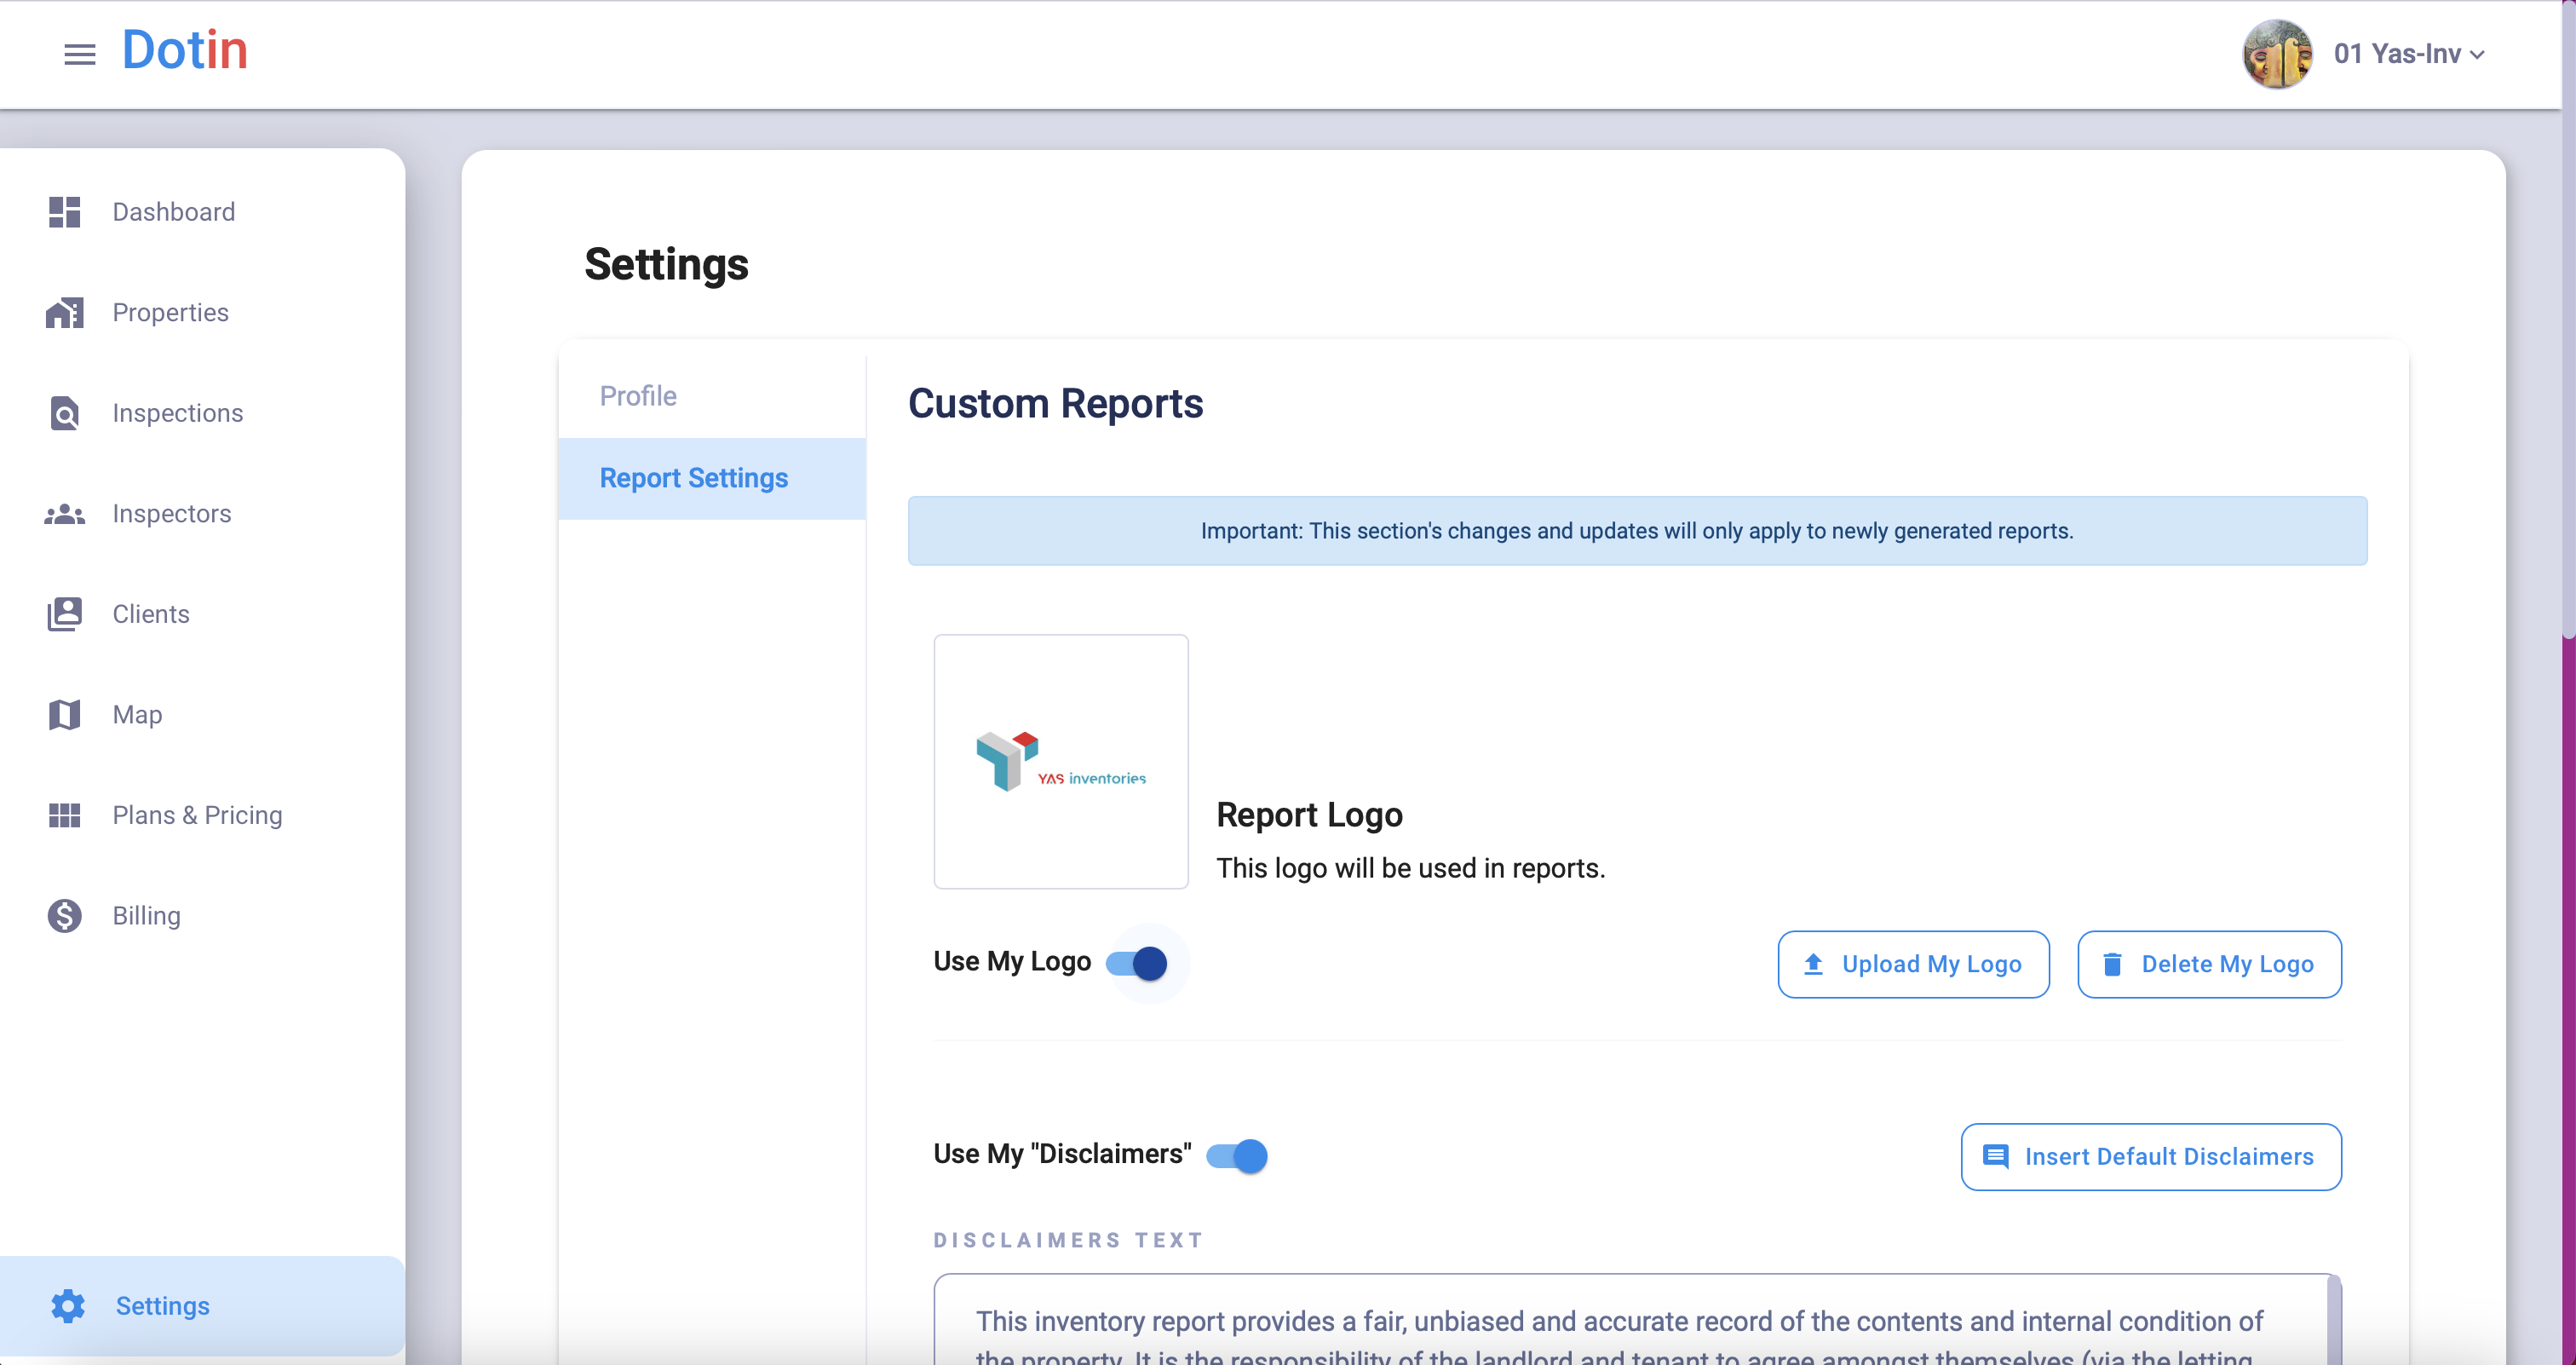
Adding your logo to your reports
To add your logo to the inspection reports, follow these simple steps:
1. Log in to your Dashboard.
2. Navigate to the Settings tab: Once logged in, locate the Settings tab in the dashboard menu. It’s usually found at the bottom of the sidebar menu.
3. Select Report Settings: Look for the option labelled “Report Settings” in the Settings menu. Click on it to proceed.
4. Enable the Logo Toggle: In the Report Settings section, you’ll find a toggle switch labelled “Use My Logo”. Please switch it on to activate the logo feature for your reports.
5. Upload your logo: Once the logo toggle is enabled, you can upload your logo. Click the designated button to select your logo file from your device’s storage.
For best results, keep the following guidelines in mind:
– Choose a square image: Selecting a square-shaped logo will result in a higher-quality appearance on the reports.
– Size limitations: Ensure that your logo image is smaller than 600×600 pixels in dimensions.
– File size limit: The file size of your logo should be less than 1MB.
6. Save the changes: After uploading your logo and ensuring it meets the specifications, click the “Save and Update” button to save the changes to your report settings.
That’s it! Your logo will now be included in the reports generated from your account. Preview your reports to confirm that the logo appears as desired.
Attention
Please be aware that any recent changes you make to your settings will only apply to new inspection reports from now on. Any previously generated inspection reports will retain the settings and configurations in place at the time of their creation.
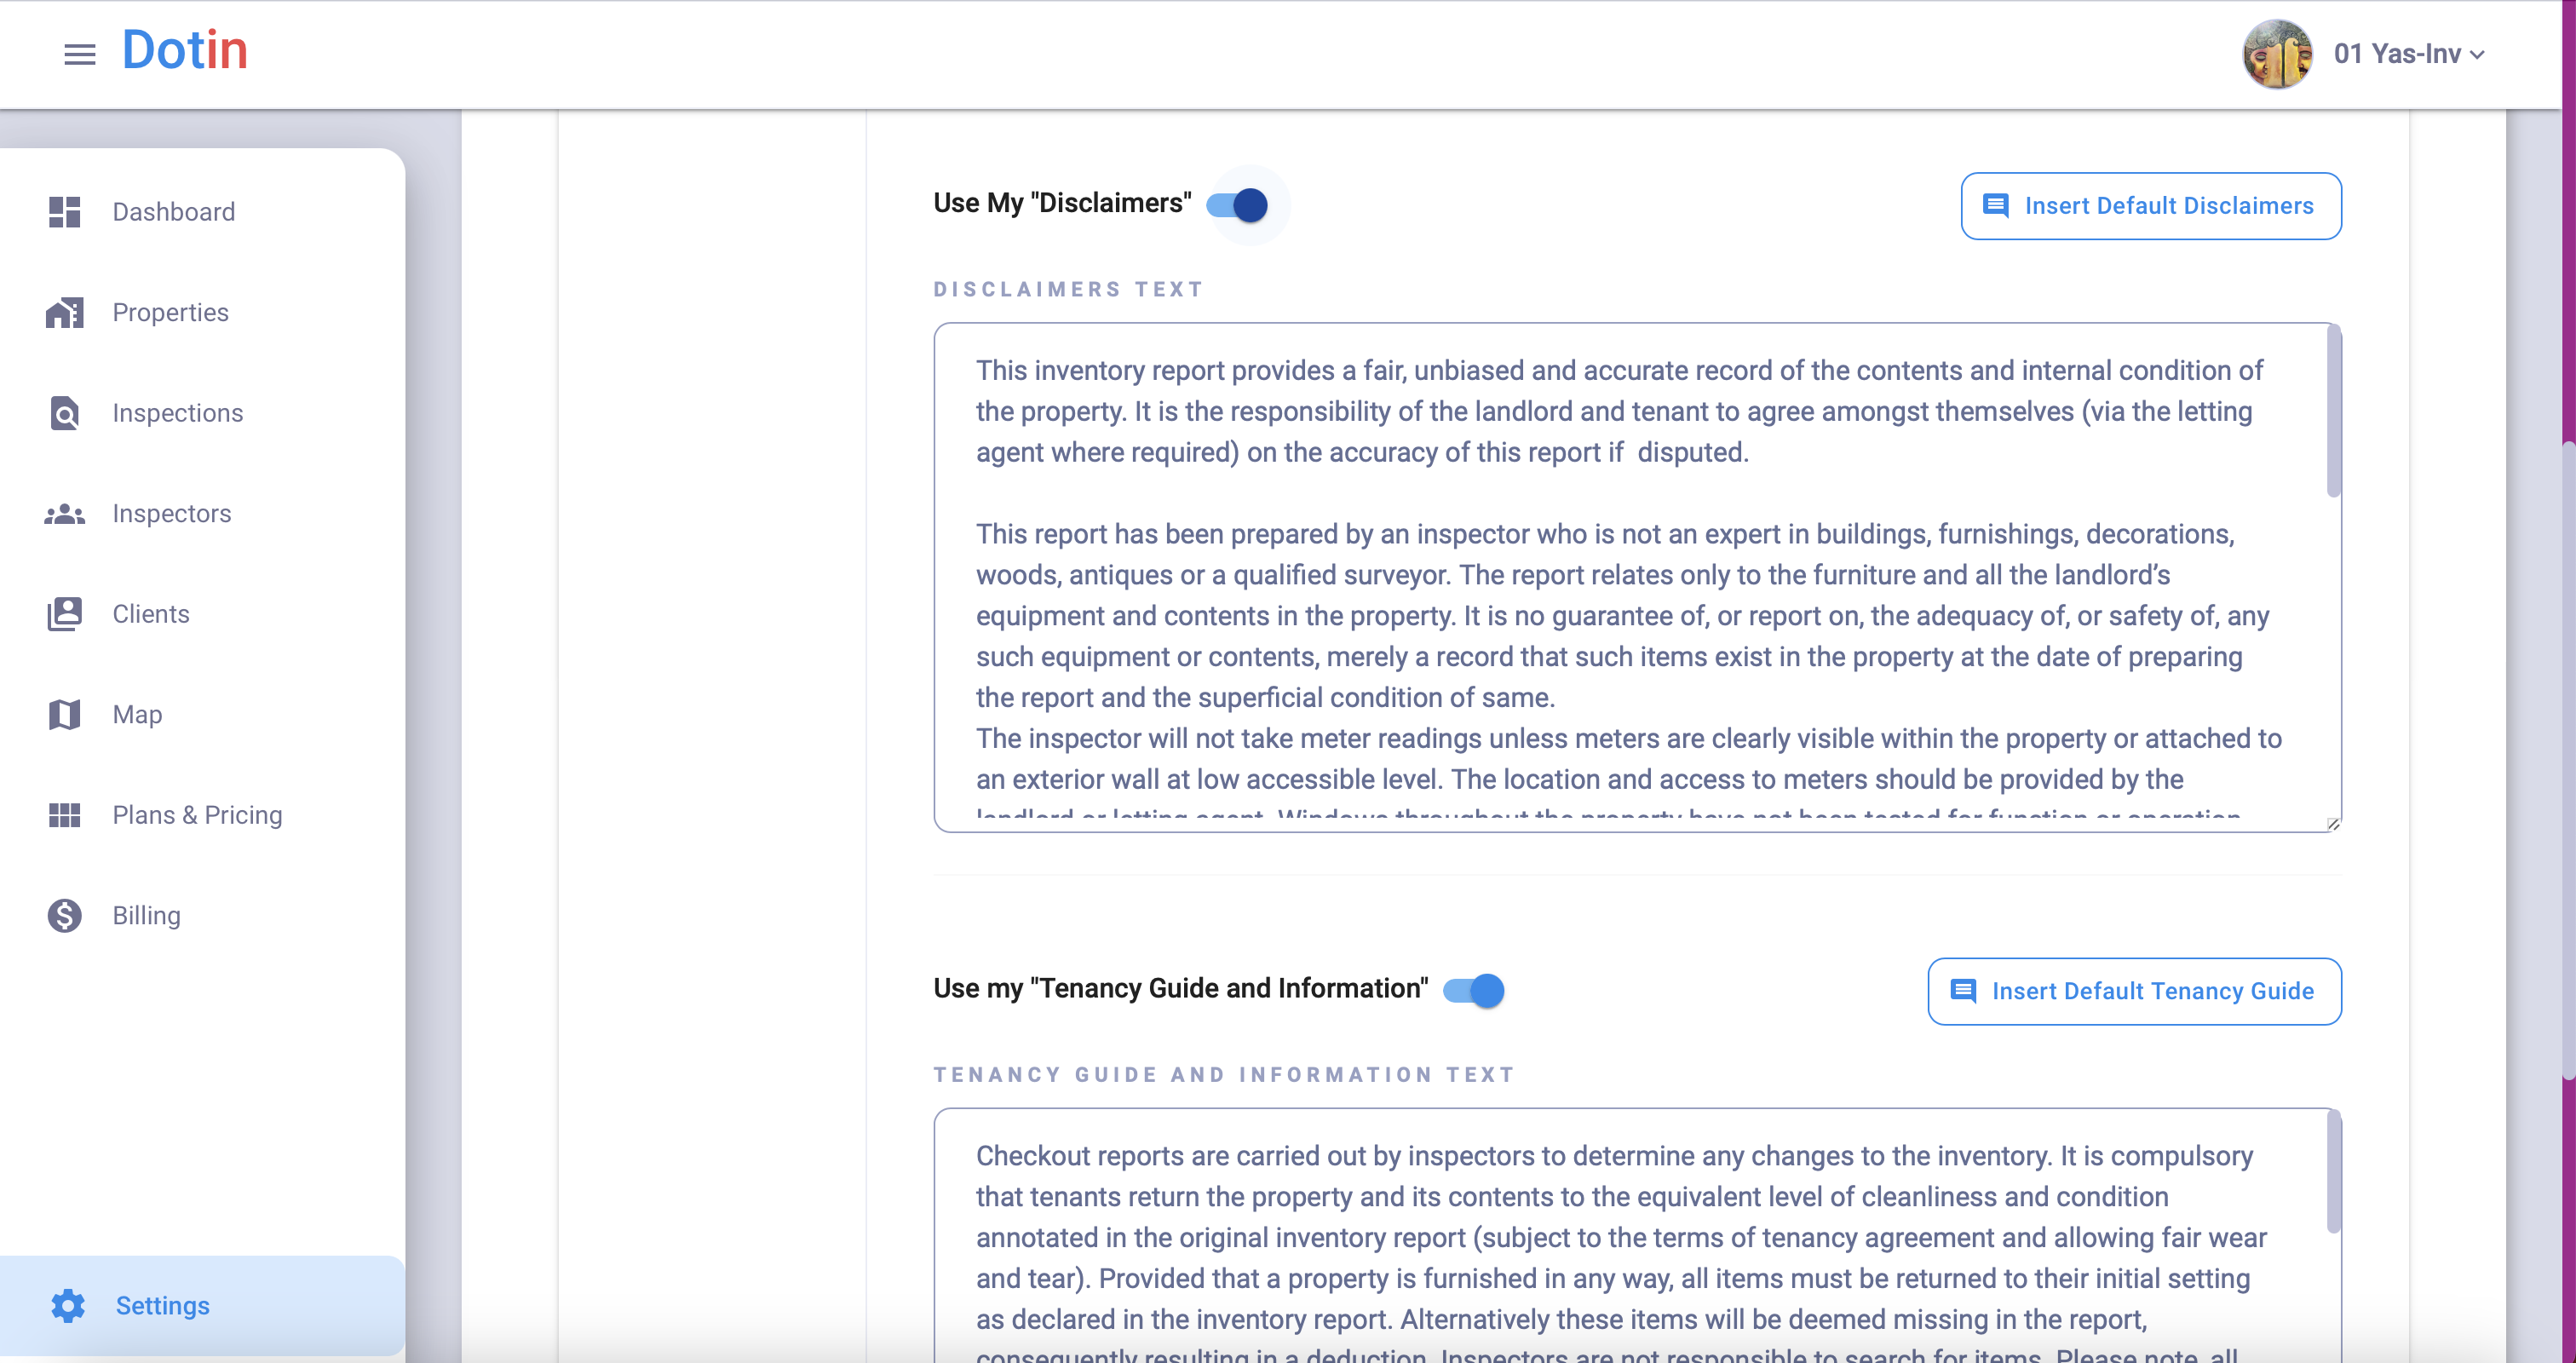
Adding your own “Disclaimer” and “Tenancy Guide and Information” documentation
Adding your own “Disclaimer” and “Tenancy Guide and Information” documentation
1. Log in to your Dashboard.
2. Navigate to the Settings tab: Once logged in, locate the Settings tab in the dashboard menu. It’s usually found at the bottom of the sidebar menu.
3. Select Report Settings: Look for the option labelled “Report Settings” in the Settings menu. Click on it to proceed.
4. Enable the Setting: In the Report Settings, you will see a toggle button related to “Disclaimer” documentation and one for “Tenancy Guide and Documentation.” Switch on the toggle button to activate this feature.
5. Customise Your Documentation: With the setting enabled, you can add documentation. You can insert your own custom text or use the default text provided.
- 5.1. Insert Custom Text: If you prefer to use your own text, click on the designated area to enter your custom “Disclaimer” and “Tenancy Guide and Information.”
- 5.2. Use Default Text: Alternatively, if you want to use the default text we provide, click on the “Insert Default” button, and the default text will be automatically added.
6. Save Your Changes: After customising or inserting the desired documentation, don’t forget to save your changes by clicking the “Save and Update” button, typically found at the bottom of the page.
7. Verify the Changes: Once saved, verify that your “Disclaimer” documentation and “Tenancy Guide and Information” are correctly displayed in the report settings.
Attention
Please be aware that any recent changes you make to your “Disclaimer” and “Tenancy Guide and Information” documentation will only apply to new inspection reports from now on. Please note that previous reports will retain the settings and content in place at the time of their creation.
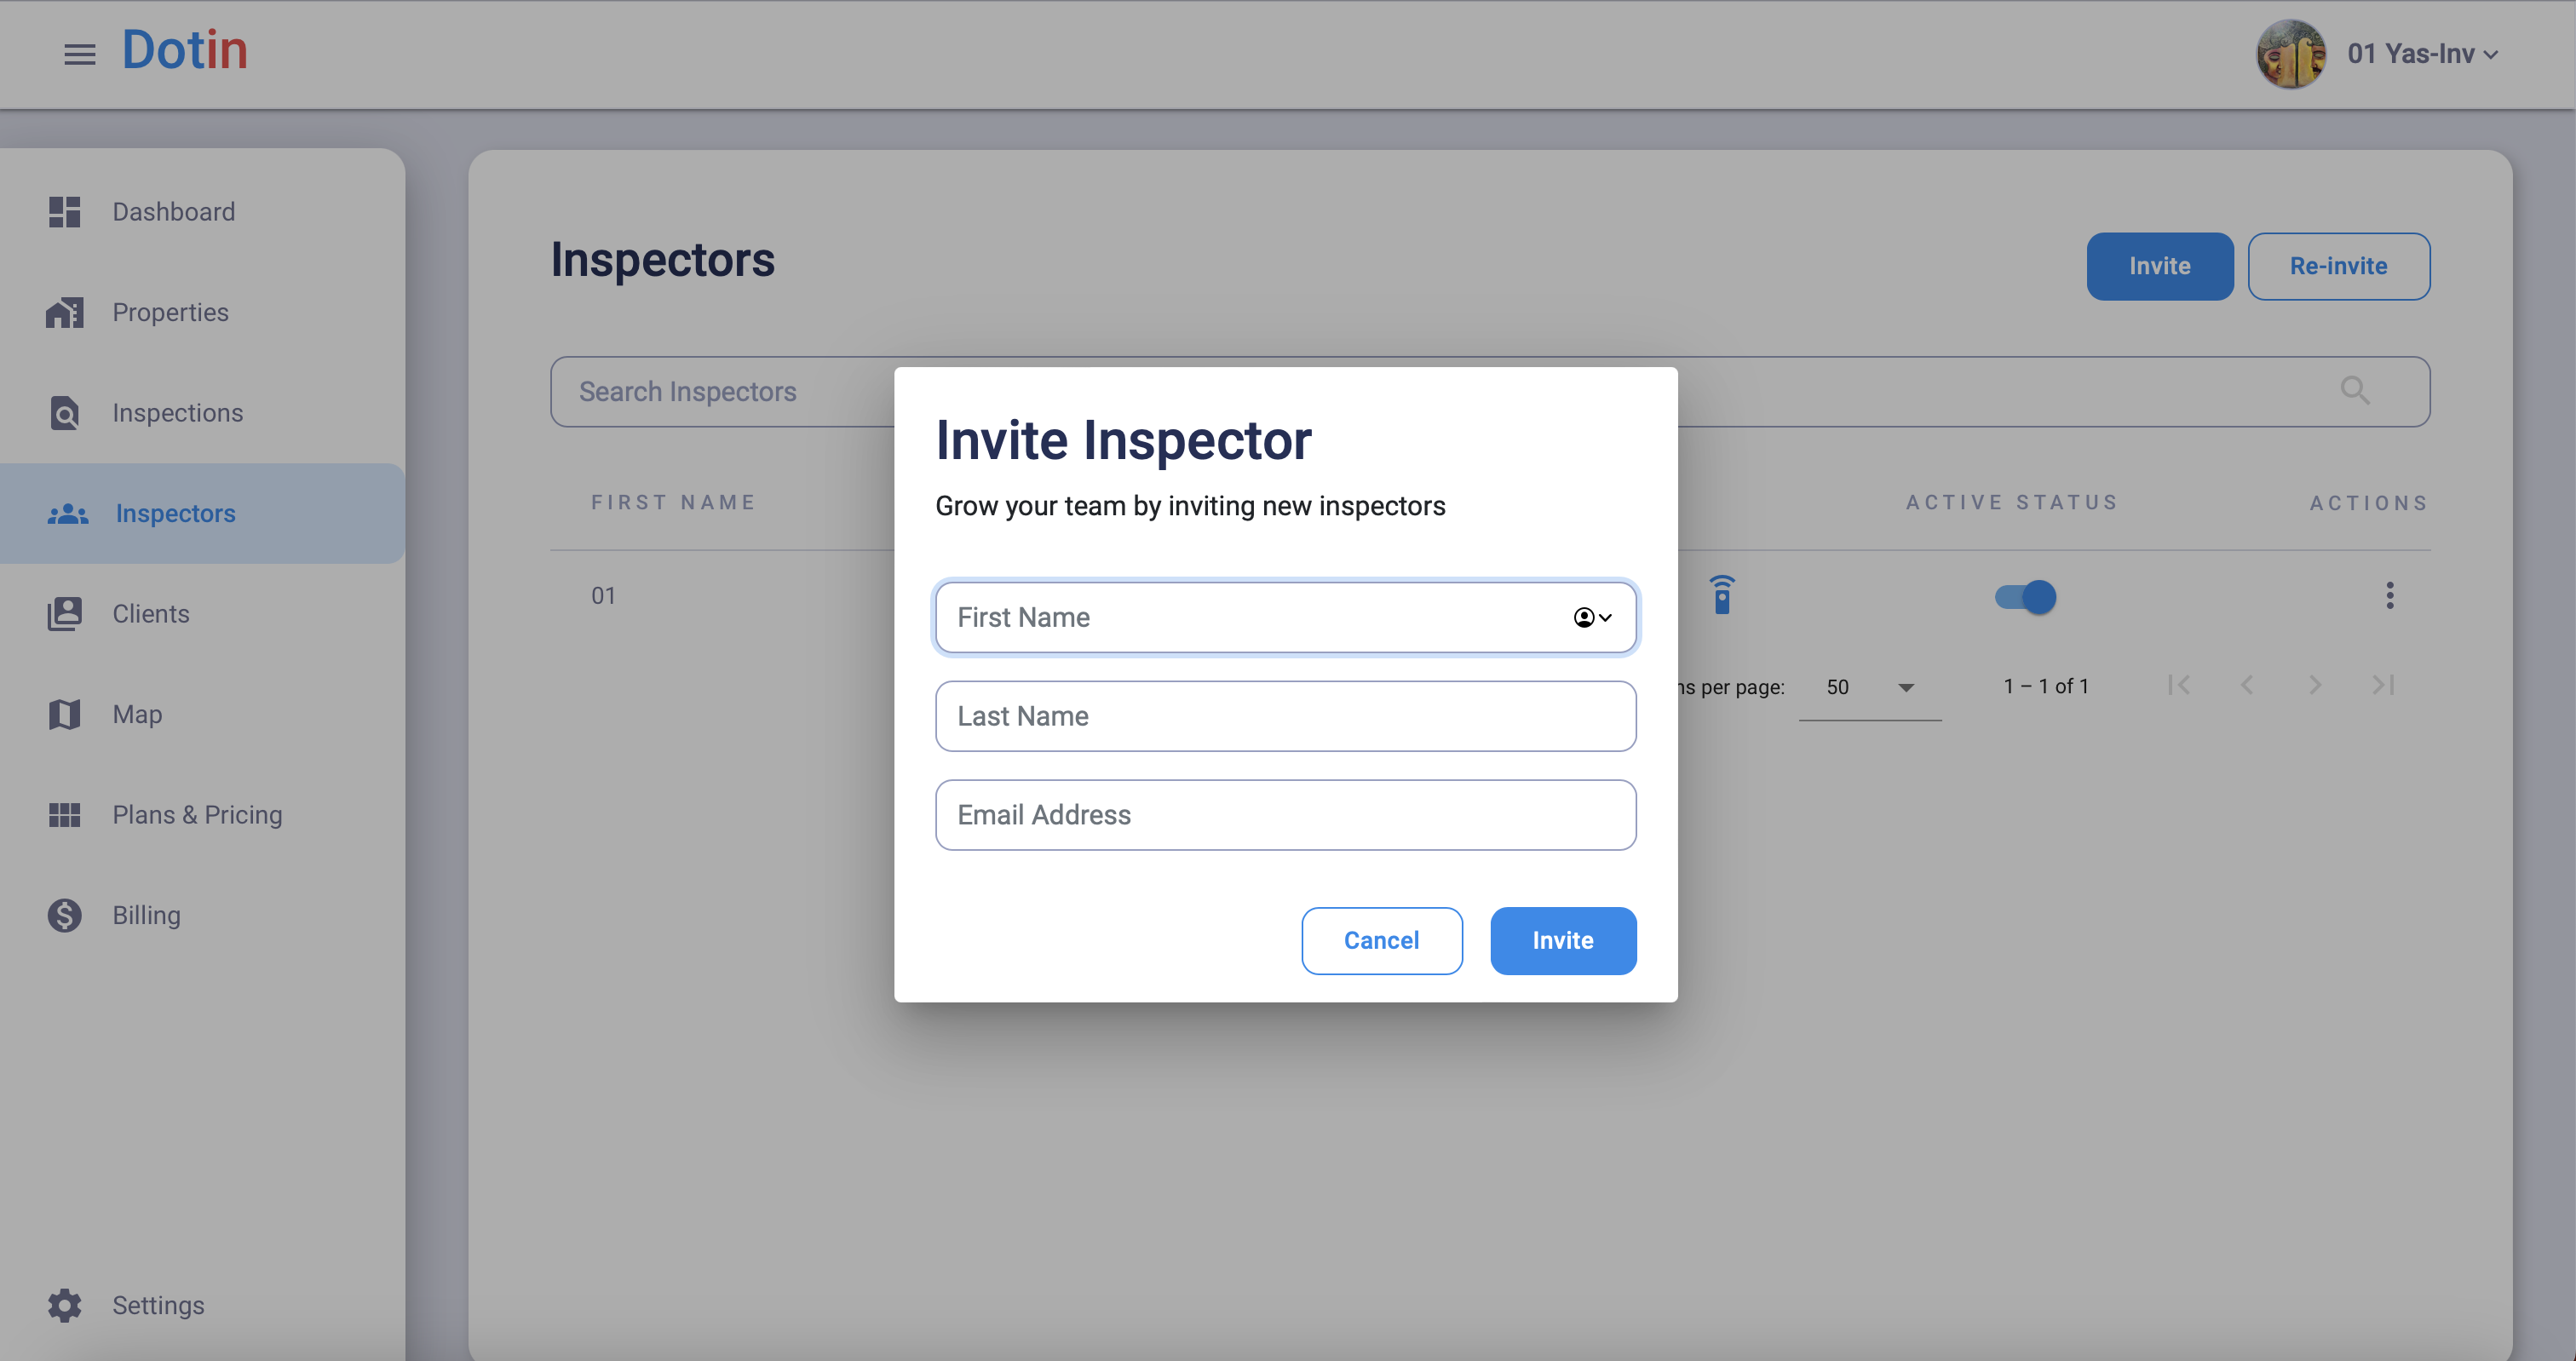
Adding Inspectors
Step-by-Step Guide: Adding Inspectors
1. Log in to Dashboard: Visit our website and log in to your admin account using your credentials.
2. Access Inspectors Tab: Once logged in, navigate to the dashboard menu and locate the “Inspectors” tab. Click on it to proceed.
3. Find the “Invite” Button: On the Inspectors page, you will notice a ” Invite ” button in the top right corner. Click on this button to initiate the process of adding a new inspector.
4. Enter Inspector’s Details: A form will appear where you can enter the inspector’s information. Provide their first name, last name, and email address. Make sure to double-check the email address for accuracy.
5. Email Verification: Instruct the inspector to check their email inbox after filling in the details. They will receive instructions to verify their email address and set up their password. Remind them to look for the email and follow the verification steps promptly.
6. Inspector’s Email and Password Setup: Once the inspector opens the email, they will find a link or a button to verify their email. By clicking on it, they will be directed to a page where they can set up their password for the account.
7. Password Security: Emphasise the importance of choosing a strong password that includes a combination of letters, numbers, and special characters. Please encourage them to create a unique and not easily guessable password.
8. Inspector Added: After the inspector successfully verifies their email and sets up their password, they are officially added as an inspector to the system. They can now log in to the Dotin app using their email address and the password they set up.
10. Repeat for Additional Inspectors: If you need more inspectors, repeat the process starting from step 3. Please enter the details of each additional inspector and guide them through the email verification and password setup steps.
Following these steps, you can easily add inspectors to your admin account.
Attention
Please note that only the admin can add and remove inspectors. Inspectors themselves do not have access to the dashboard panel. Their access is limited to the Dotin app for generating inspection reports only.
Confidentiality on Reports: If you wish to exclude the names of inspectors from the generated reports, you can use placeholder codes instead. For example, you may enter “012” in the first name field and “inspect” in the last name field or any other credentials you prefer to use. This ensures the inspector’s name will not be displayed on the report.
Remember these important points while adding inspectors to your admin account.
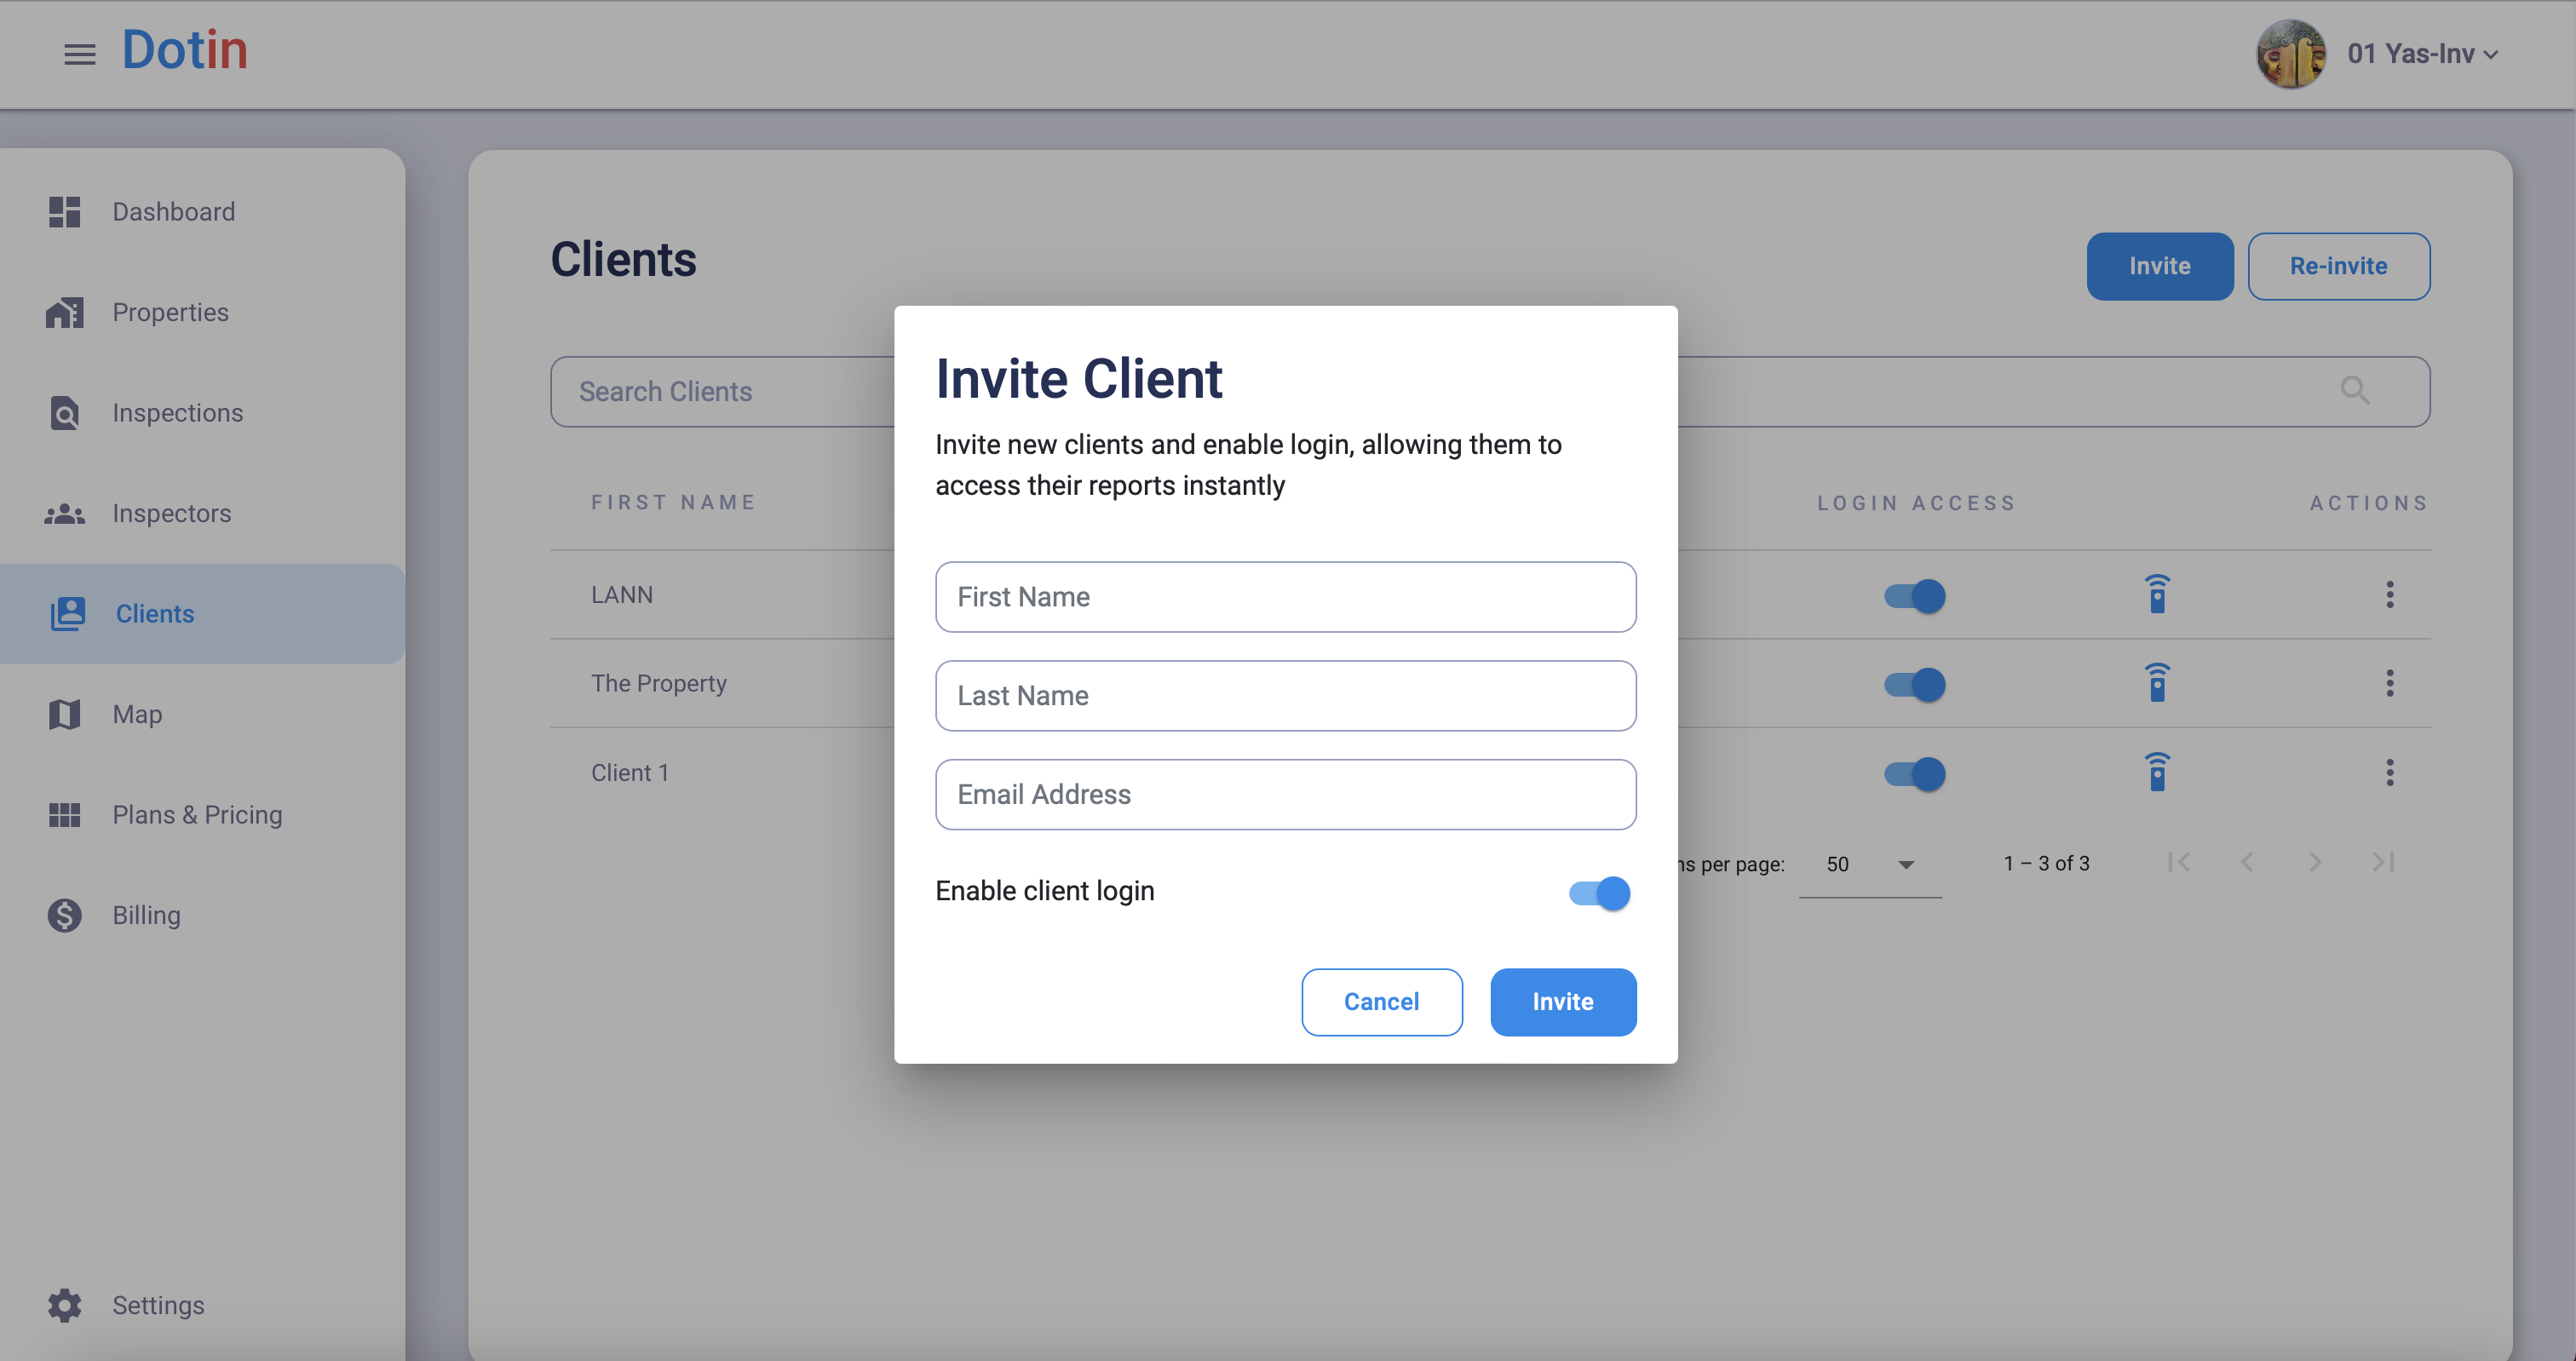
Adding Clients
Step-by-Step Guide: Adding Clients
1. Log in to Dashboard: Visit our website and log in to your admin account using your credentials.
2. Access Clients Tab: Once logged in, navigate to the dashboard menu and locate the “Clients” tab. Click on it to proceed.
3. Find the “Invite” Button: On the Clients page, you will notice a ” Invite ” button in the top right corner. Click on this button to initiate the process of adding a new client.
4. Enter Clients Details: A form will appear where you can enter the client’s information. Provide their first and last names, or add their companies’ names in the first and last name field and email address. Make sure to double-check the email address for accuracy.
5. Enable Client Login: Below the email address field, you will see a toggle button related to “Enable client login”. Switch on the toggle button to activate the client login access. If you do not switch on this toggle, your client cannot log in and view, share and download their inspection reports.
6. Email Verification: Instruct the client to check their email inbox after filling in the details and switching on the “Enable client login”. They will receive instructions to verify their email address and set up their password. Remind them to look for the email and follow the verification steps promptly.
7. Client’s Email and Password Setup: Once the client opens the email, they will find a link or a button to verify their email. By clicking on it, they will be directed to a page where they can set up their password for the account.
8. Password Security: Emphasise the importance of choosing a strong password that includes a combination of letters, numbers, and special characters. Please encourage them to create a unique and not easily guessable password.
9. Client Added: After the client successfully verifies their email and sets up their password, they are officially added as a client to the system. They can now log in to the Dotin Dashboard using their email address and the password they set up.
10. Repeat for Additional Clients: If you wish to add more clients, repeat the process starting from step 3. Please enter the details of each additional client and guide them through the email verification and password setup steps.
Following these steps, you can easily add clients to your admin account.
Attention
Please note that only the admin can add and remove clients. Clients themselves do not have access to the mobile app. Their access is limited to the Dotin Dashboard using the web browser for digital signatures, sharing reports, and downloading and printing reports.
Confidentiality on Reports: If you wish to exclude the personal names of clients from the generated reports, you can use placeholder codes instead. For example, you may enter their company’s name in the first name and the last name field or any other credentials you prefer to use. This ensures the client’s name will not be displayed on the report.
Enable Client Login: Ensure you switch the toggle button to activate the client login access. Your client cannot log in if you do not switch on this toggle.
Remember these important points while adding clients to your admin account.
Create New Inspection
Here’s a step-by-step guide on how to create a new inspection:
1. Log in to your admin account and access the Dashboard.
2. Locate the Inspection tab in the navigation menu and click on it.
3. In the top right corner of the page, you will find a “New Inspection” button. Click on it to begin the creation process.
4. Fill in the required details for the inspection. This may include information such as the property address, inspection date, and additional notes or instructions.
5. When you click on the “Property Address” field, a “Previously Inspected Properties” screen may appear as a popup. Here, you can search for a property you have previously inspected or click the “More” button on the bottom right of the screen to enter a new address manually. Once you have selected the desired property, click “Select” to exit the screen.
6. Select the inspector who will carry out the inspection from the available options. This ensures that the appropriate inspector is assigned to the task.
7. Choose the client associated with the inspection. This helps in organising and categorising the inspections for each client.
8. After entering all the necessary details, click the “Create” button on the bottom right of the screen.
9. Congratulations! You have successfully created a new inspection. You can now conduct the inspection and document the property’s condition.
Edit Inspection Address
Attention
Please note that you can only change the address of an inspection if it is in the “Assigned” or “Completed” status. If the inspection is in any other status, such as “Started” or “Cancelled,” the address cannot be modified. Therefore, it is important to ensure that the inspection has the appropriate status before changing the address.
Upgrades and Downgrades
Here is a step-by-step guide on upgrading and downgrading your plan as an Admin/Account holder:
1. Log in to Dashboard: Only an admin and account holder can upgrade and downgrade their plans. Access your account by logging in to the Dashboard using your credentials.
2. Navigate to Plans and Pricing: Locate the “Plans and pricing” tab once logged in. It is usually found in the sidebar. Click on it to proceed.
3. Upgrade Plan: If you are currently on a free account and wish to upgrade your plan, you will find different plan options available. Choose the plan that suits your needs and click on the “Upgrade” button provided. Follow any additional prompts or instructions to complete the upgrade process. Payment details may be required if the selected plan is not free.
4. Downgrade Plan: To downgrade your plan, ensure that the storage used in your current plan is less than the storage limit of the desired downgrade plan. You can proceed with the downgrade if your storage usage is within the limits. Look for the downgrade options provided on the Plans and Pricing page. Select the appropriate plan that meets your requirements and click the “Downgrade” button. Follow any further instructions to complete the downgrade process.
Attention
When Downgrading your plan, please note that the ability to downgrade plans may be subject to certain limitations based on storage usage. It is important to ensure your storage usage is within the downgrade plan you select.
Billing
Get to know your Billing Tab.
1. Log in to your admin account and access the Dashboard.
2. Locate the Billing tab on the left side of the navigation menu. Click on it.
Within the Billing section, you will find the following tabs:
1. Subscription: This tab provides information about your current subscription status and plan. It displays details such as your storage usage and the pricing plan you are currently on.
2. Payment: In the Payment tab, you can update or add new card details for your account’s payment method. You also have the option to delete a payment method. Remember that deleting your payment method while having an active subscription may lead to limitations on your account when the payment is due.
3. Invoices: The Invoices tab lists the payments you have made. You can view and download your receipts or invoices from this section.
4. Upcoming Invoices: This tab shows when your next payment is due and the corresponding amount. It provides an overview of your upcoming invoices to help you stay informed about your billing schedule.
5. Open Invoices: If, for any reason, a payment fails and access to your account becomes limited, you can check the Open Invoices tab. You can manually pay to reactivate your account and resolve any outstanding invoices here.
Please note that the Billing section is designed to provide you with important information about your subscription, payment details, and invoices. It allows you to manage and maintain your account’s billing status effectively.
Attention
Only the admin can access the Billing tab containing essential billing and payment information.
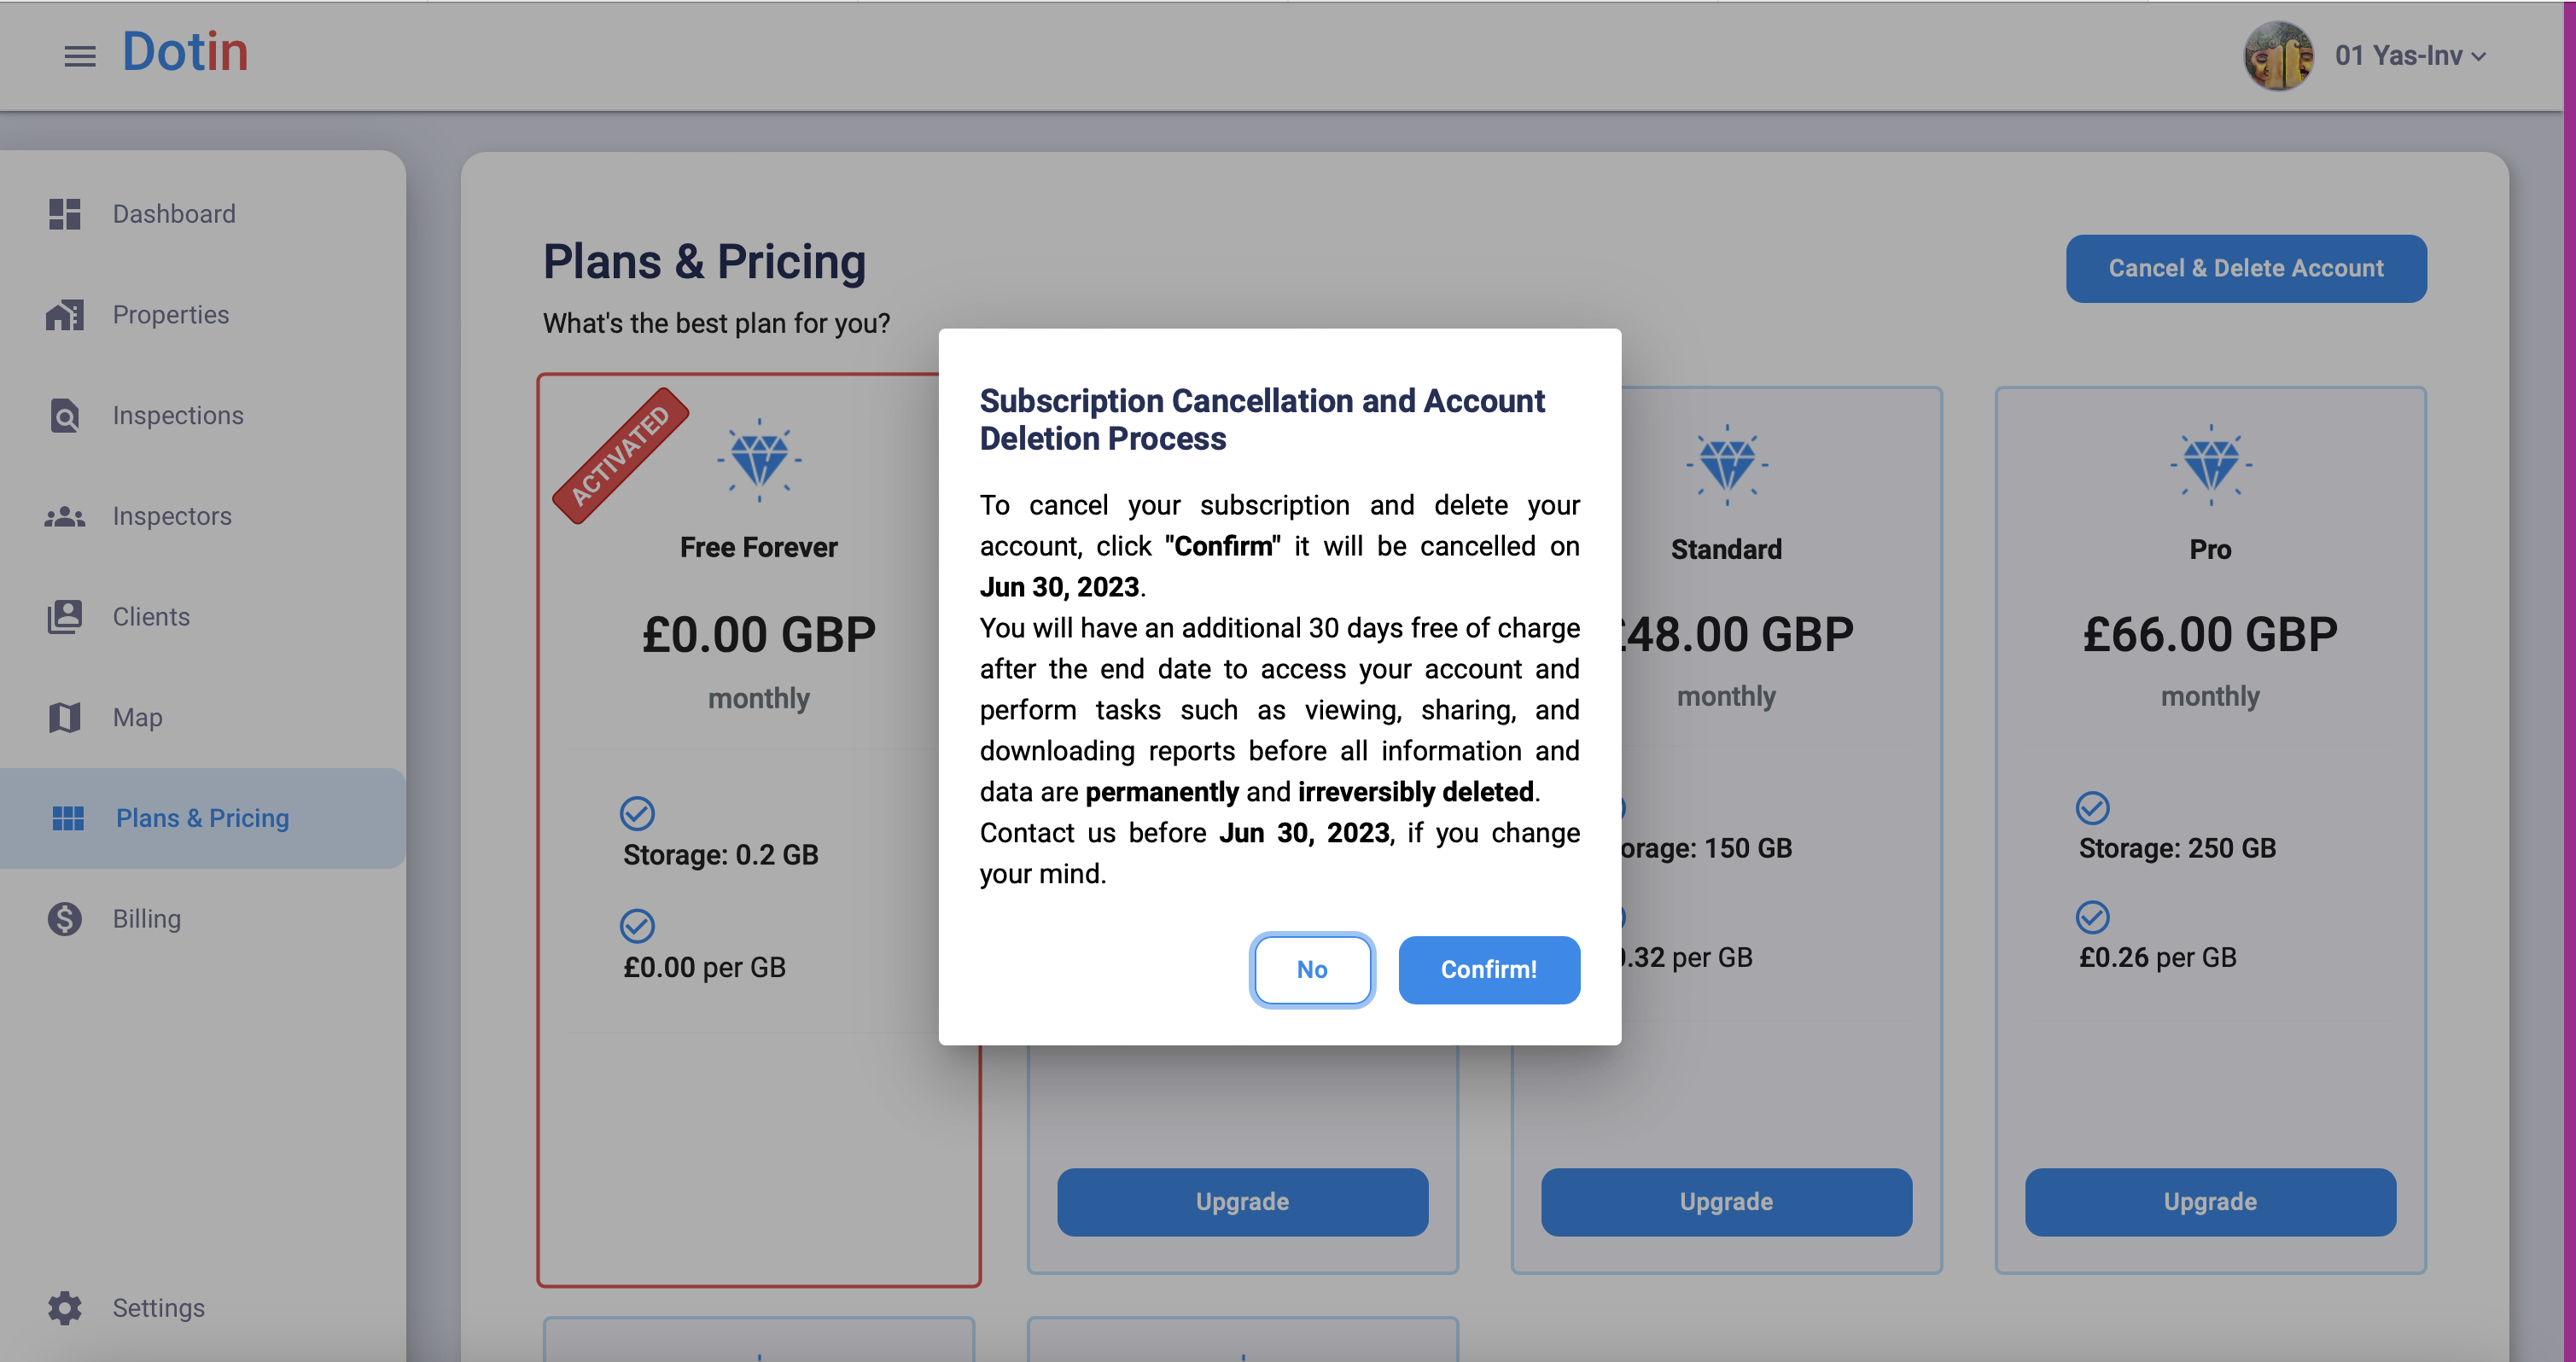
Cancel and Delete Account
1. Log in to your admin account and access the Dashboard.
2. Navigate to the “Plans and Pricing” tab on the navigation menu’s left side.
3. Within the “Plans and Pricing” section, look for the “Cancel and Delete Account” button. It is usually located in the top right corner of the page. Click on it.
4. A confirmation prompt will appear, asking you to confirm the deletion process. Take a moment to review your decision.
5. If you are sure about cancelling and deleting your account, click the confirmation button to proceed.
6. Once you initiate the Cancel & Delete Account process, your account will remain active until the next billing date. You will have an additional 30 days free of charge after the end date to access your account and perform tasks such as viewing, sharing, and downloading reports before all information and data are permanently and irreversibly deleted. Contact us before your next billing date ends if you change your mind.
7. Once the deletion process is complete, you, your clients, and inspectors can no longer access your account or its associated data.
Attention
Please note that cancelling and deleting your account is irreversible and permanent. Ensure you have downloaded important data or information before initiating the account deletion process. Once the deletion is completed, all your account data, including reports, settings, user information, and client/inspector logins, will be permanently removed.
App Guide
Get to know your Dotin App and its awesome features
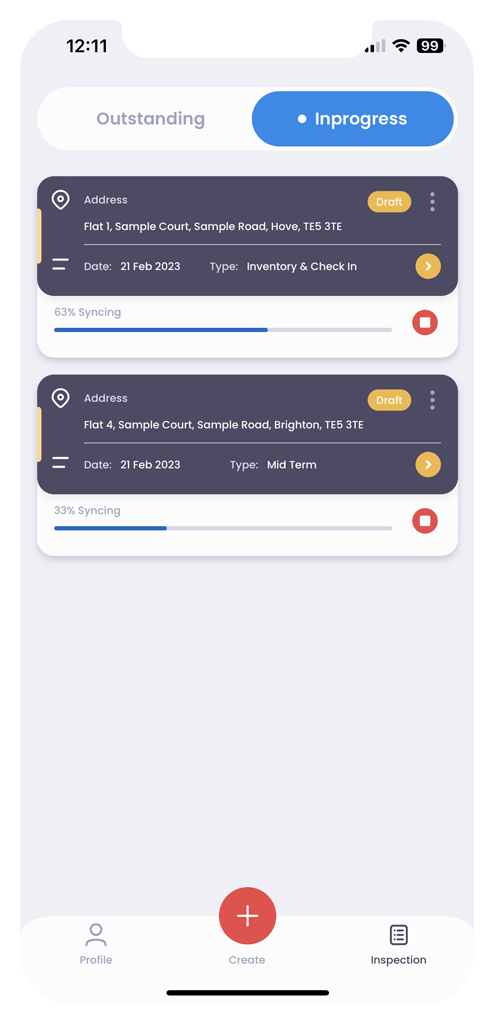
Landing Screen
1. Outstanding Tab:
- In the Outstanding tab, you will find a list of inspections that have been assigned to you.
- The inspections are sorted by date, with the earliest ones appearing at the top of the list.
- This tab helps you easily identify which inspections must be completed first.
2. In Progress Tab:
- The In Progress tab allows you to access and edit already-started inspections. After an inspection is started, you no longer need the internet to carry out your report.
- Select the inspection you wish to work on or continue editing.
- This tab allows you to conveniently resume working on an inspection you previously started.
- You can sync up to 4 reports simultaneously.
You can pull down to refresh the page and see if you have been assigned any new jobs. These two sections help you manage and organise your inspections effectively, ensuring that you stay on top of your assigned tasks and have easy access to inspections in progress.
Attention
Please ensure your device is connected to the internet when you pull down to refresh the page and check for any newly assigned jobs. This will ensure that you receive the latest updates and information accurately.
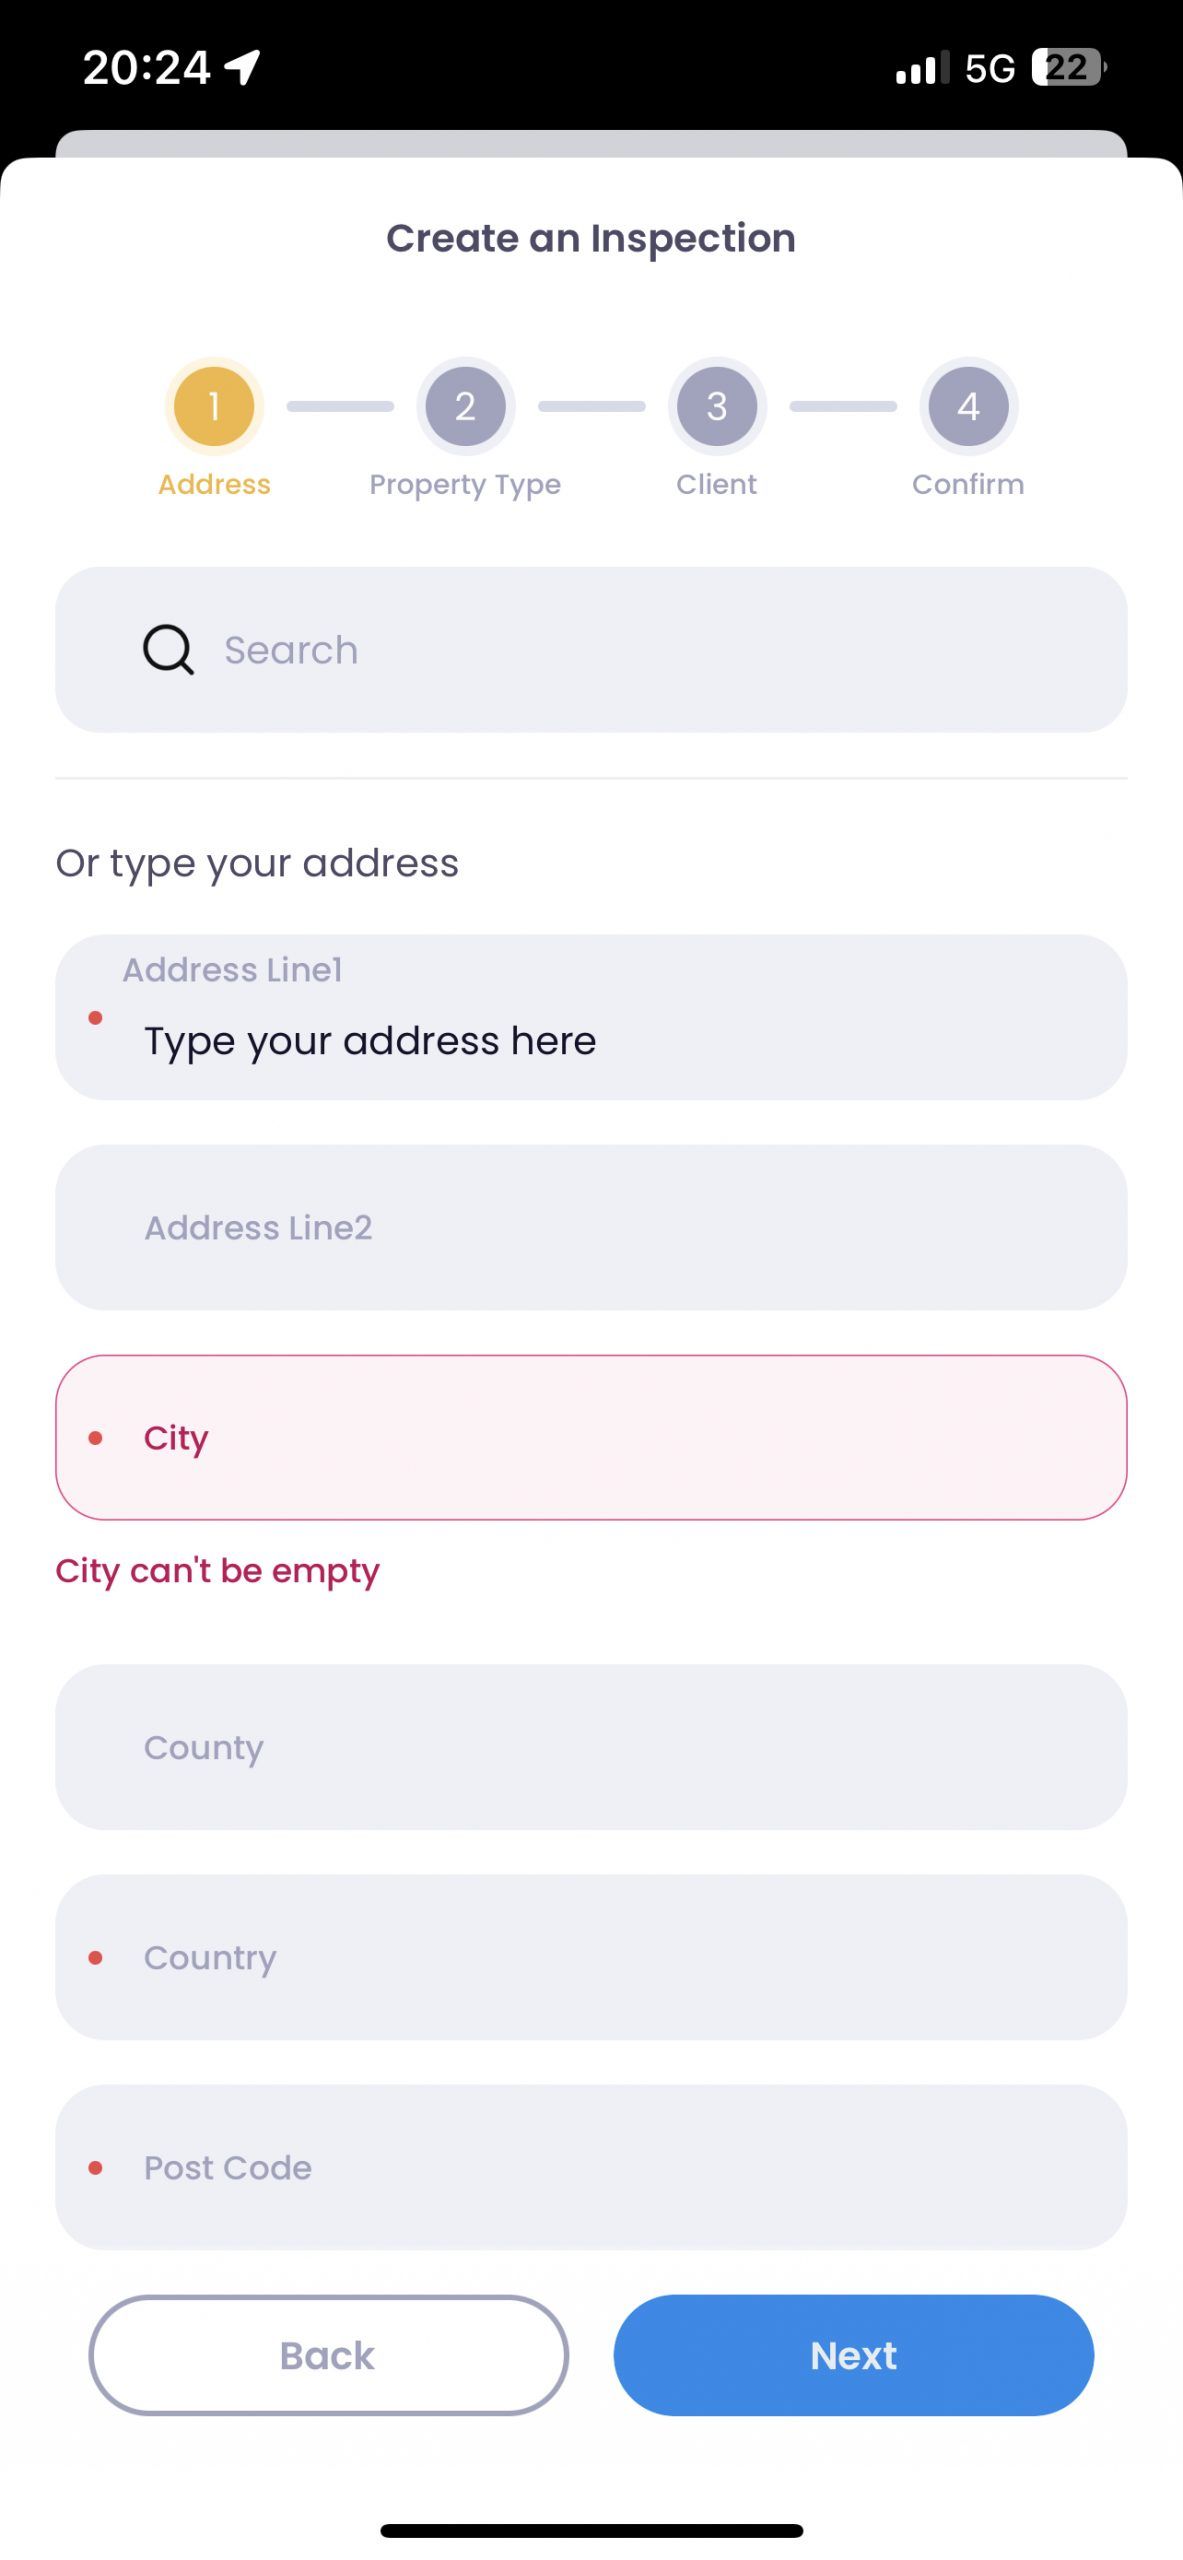
Create a New Inspection
Here’s a step-by-step guide on how to create a new inspection in the app:
1. Locate the red plus button:
- You will find a red plus button at the bottom centre of the screen.
- Tap on this button to initiate the process of adding a new inspection.
2. Previously Inspected Properties:
- After pressing the plus button, a “Previously Inspected Properties” popup page will appear.
- This page displays a list of properties you have previously inspected.
- Select your desired inspection from the list if you want to inspect a property you have visited before.
- Alternatively, close the popup page to enter a new address manually or search for a new specific address by pressing the search button.
3. Enter Property Details:
- Proceed to enter the property details, such as property type, client, and other relevant information.
- Select the appropriate property type from the provided options.
- Choose the client associated with the inspection from your client list.
4. Confirm and Create:
- After entering the necessary details, confirm the information you have provided.
- Double-check the accuracy of the property details and client information.
- Once satisfied, click the confirm button to create the new inspection.
5. Outstanding Tab:
- Upon confirming the new inspection, you will see it listed in the Outstanding tab on the landing screen.
- The Outstanding tab displays a chronological list of inspections that need to be completed, with the earliest ones at the top.
Following these steps, you will successfully create a new inspection in the app and find it listed in the Outstanding tab for easy reference and management.
Attention
Please ensure your device is connected to the internet to create a new inspection and begin the inspection process. However, once you press the “Start” button, you no longer require an internet connection to carry out the inspection report.
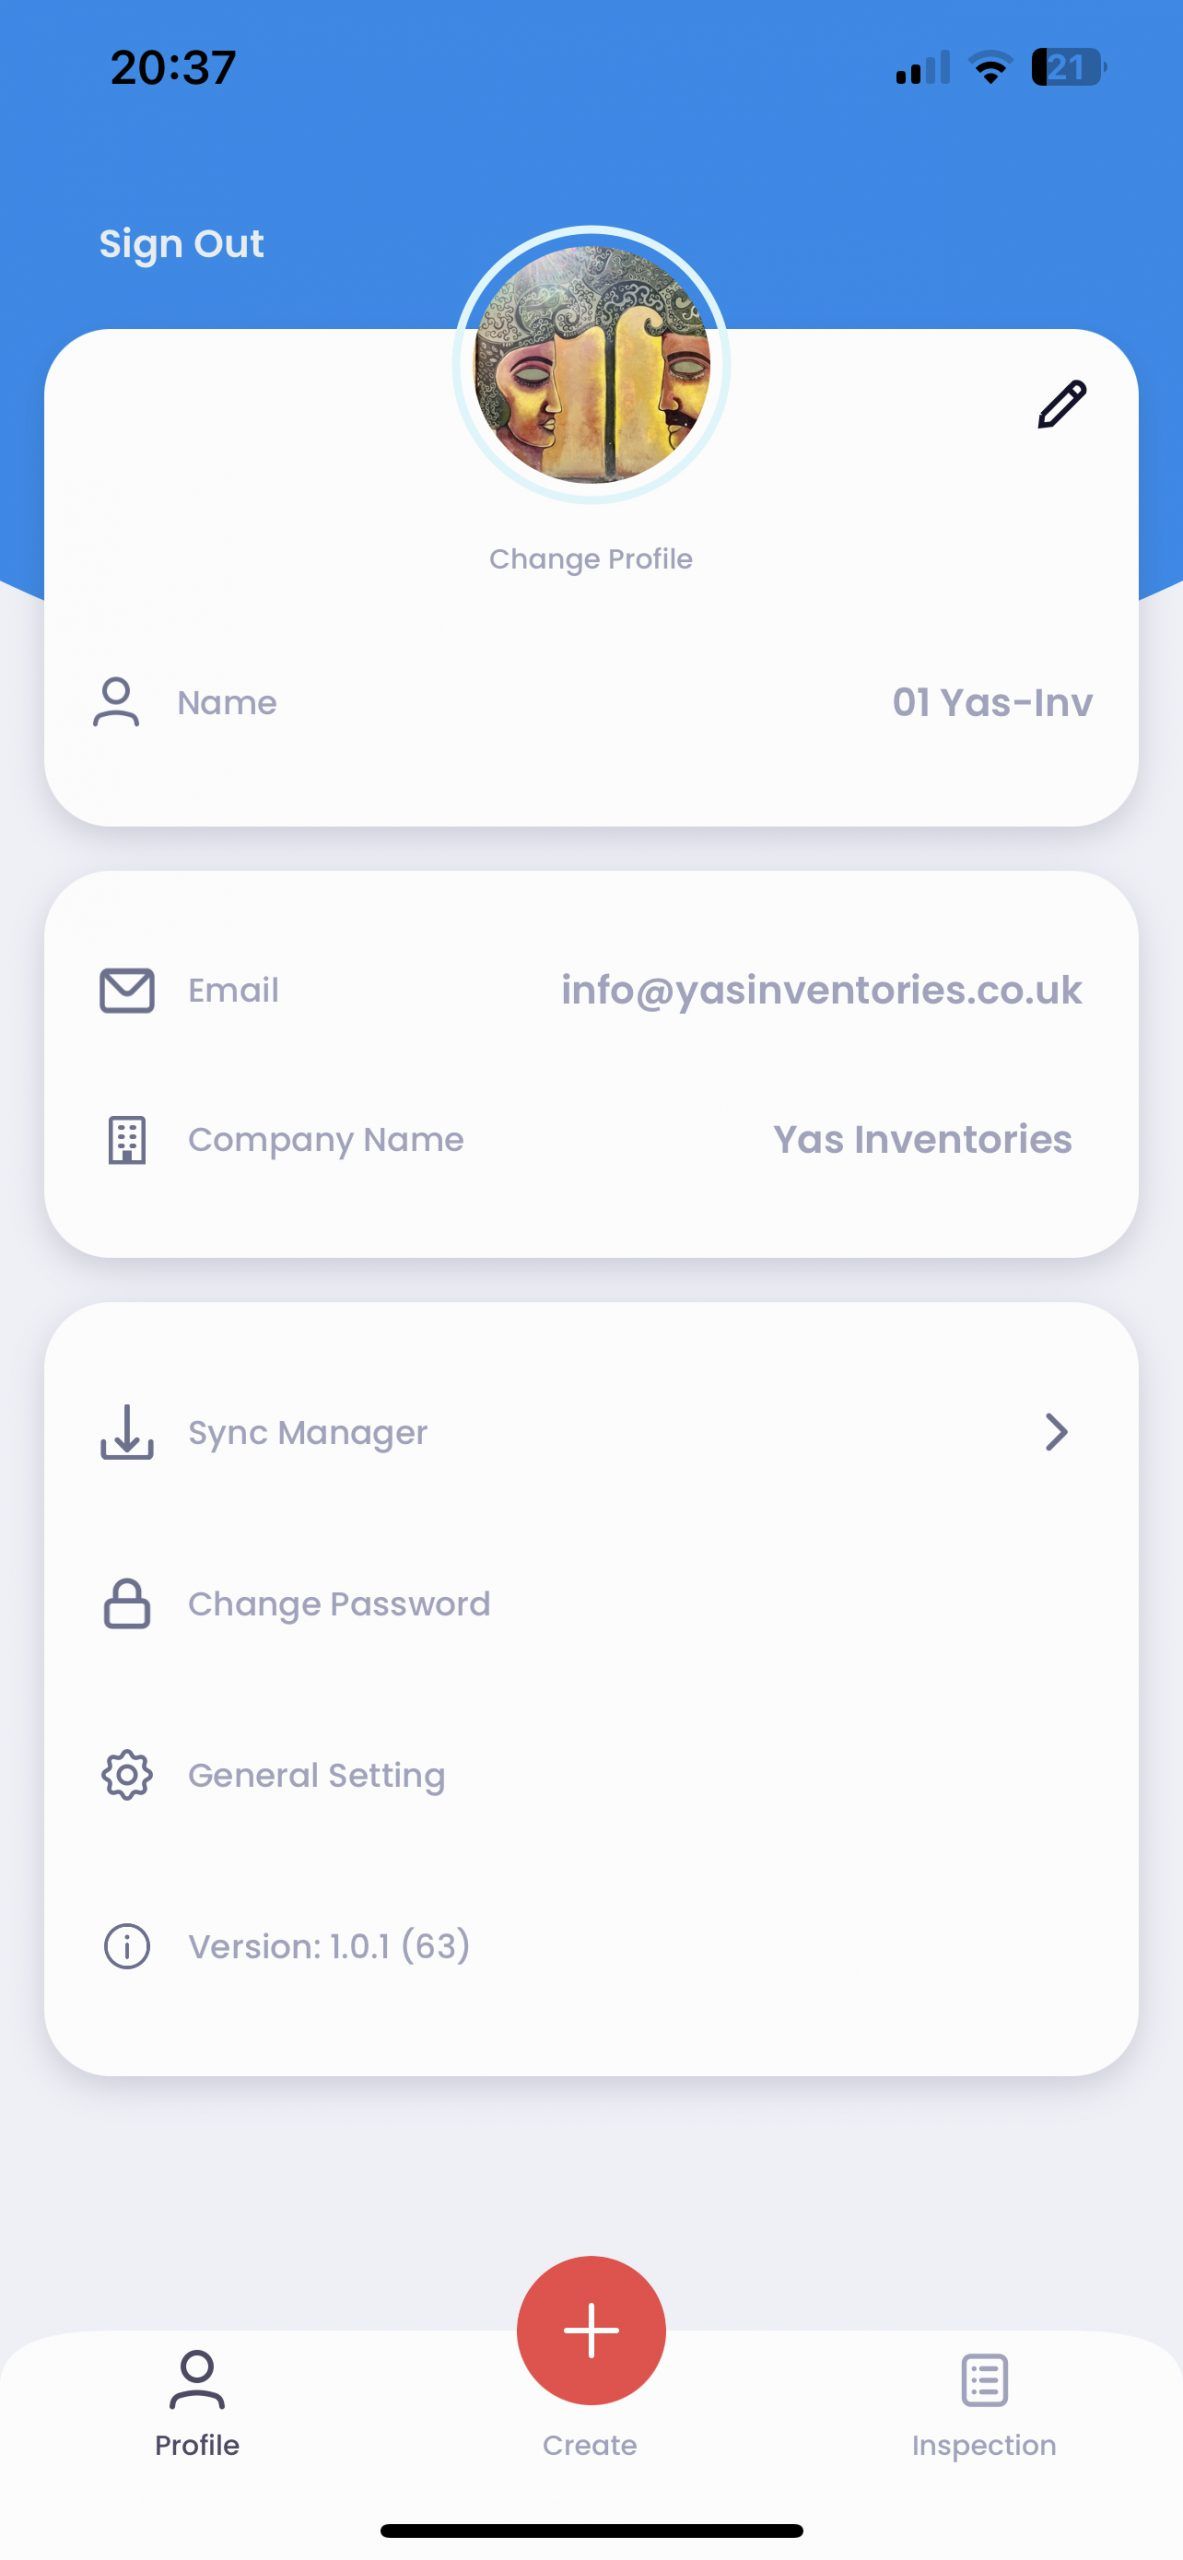
Profile Screen
The Profile screen allows you to personalise and manage your account settings. Here’s what you can do on this screen:
1. Add a Profile Picture: You can upload a profile picture to personalise your account. Click on the profile picture section and select an image from your device.
2. Change Your Name: If you want to update your name, click the edit icon 🖊️. Enter your new name and save the changes.
3. Change Your Password: Click the password section to update your password. You will be prompted to enter your new password and then confirm your new password. Make sure to choose a strong and secure password.
4. Access Sync Manager: The Sync Manager allows you to manage the synchronisation of your reports. You can access it by clicking on the Sync Manager option. From there, you can pause or resume data synchronisation per your preference.
5. General Settings: You can access additional settings related to the app’s Images Optimisation capabilities. Read the Image Optimisation section for more details.
Attention
Please be aware that any recent changes you make to your “Disclaimer” and “Tenancy Guide and Information” documentation will only apply to new inspection reports from now on. Please note that previous reports will retain the settings and content in place at the time of their creation.
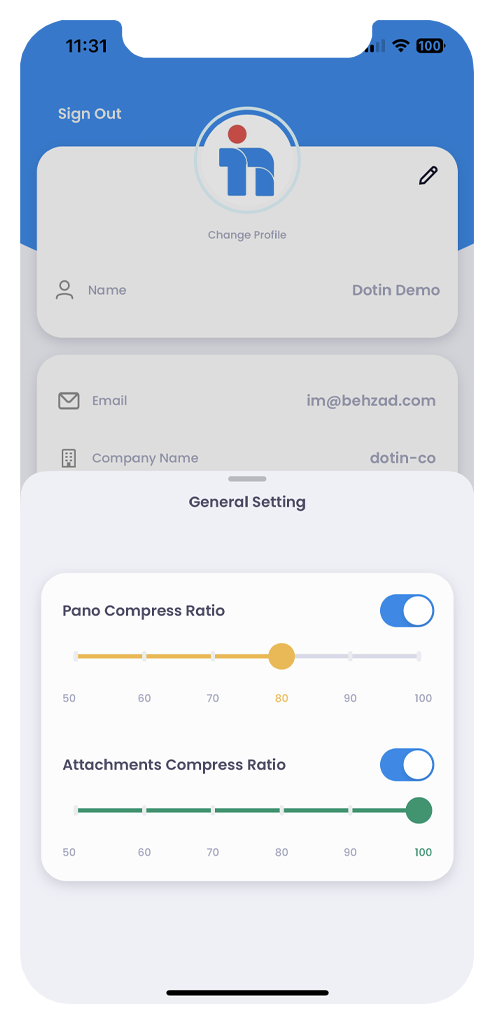
Image Optimisation
Once you enter the General Settings in the Profile screen, you will come across two options with toggle switches: Pano Compress Ratio and Attachment Compress Ratio. These toggles are initially switched off. Here’s what each option does and our recommended settings:
1. Pano Compress Ratio: This option allows you to compress 360 images or 2D images that you have captured or uploaded from your gallery. By setting the compress ratio, you can adjust the image quality. We recommend setting the Pano Compress Ratio to 90% for the best balance between image quality and optimised sync times.
2. Attachment Compress Ratio: This option optimises multiple images captured within Dots attached to the 360 and 2D images. Adjusting the compress ratio can optimise the image quality and sync times. We suggest setting the Attachment Compress Ratio to 70% for optimal results. Alternatively, you can set both the Pano Compress Ratio and Attachment Compress Ratio to 80% for balanced image quality and faster sync times.
Setting the image compress ratios helps maintain a good balance between image quality and efficient data synchronisation. It ensures that your images are optimised for storage and transfer while retaining a satisfactory visual quality level.
Attention
It is important to note that you only need to set the image optimisation settings once. Configure your settings before syncing your report to ensure the images are uploaded with the desired compress ratio.
Furthermore, if you are uploading images from your device’s gallery that have already been optimised or resized before, please be aware that the optimisation process will further reduce the file size, potentially affecting the image quality if it has been reduced. Keep this in mind while selecting and uploading images to maintain the desired level of image quality in your reports.
Connecting to 360 Cameras and Capturing Images
Here’s a step-by-step guide on how to connect to a 360 camera:
- Start an inspection by selecting the desired inspection and clicking the “Edit Report” button.
- Choose the area or room from which you want to capture a 360 image.
- Click on the “Add New 360 Image” button. A small screen will appear with several options: Gallery, Camera Roll, Use Ricoh Camera and Use Insta360 camera.
- If you have a Ricoh Theta V or Theta Z1, select the “Use Ricoh” option. If you have an Insta360 One X2, choose the “Use Insta360” option.
- Suppose you still need to connect to your 360 camera. In that case, a message will prompt you with instructions on how to connect to your specific camera.
- Once connected, you will see a live view of the room you want to capture. Below the live view, a gallery will show a list of images from the 360 camera.
- Press the capture button to take a new image and have it appear in the gallery.
- Select the desired 360 image from the camera gallery.
- You are now ready to add dots and details to the 360 images for that specific room.
Attention
Please note that the Dotin app is only compatible with our recommended 360 cameras, including the Ricoh Theta Z1, Ricoh Theta V, and Insta360 One X2. These cameras have been tested and optimised for use with our app.
To streamline your inspection process, we suggest capturing all the necessary 360 images at the beginning of your inspection. This approach will save you time by eliminating the need to connect to the 360 camera each time you want to capture a new image for a room or area.
Following this recommendation, you can maximise efficiency and ensure a smooth workflow using the Dotin app with your 360 camera.
Adding Dots to your Images
Here’s a step-by-step guide for adding Dots in the Dotin app:
- Open the report screen and select the room where you want to add information.
- Choose a 360 or 2D image from the options to add Dots.
- On an iOS device, press and hold on the area or item within the image where you want to add notes. A popup screen will appear.
- In the popup screen, provide the necessary details such as Description, Condition Slider, Comments, and select Tag icons (you can choose up to two icons). You can add your own Tag Description if you don’t see the desired Tag Icons. You can also add multiple images to the Dot if needed.
- Press the “Done” button to save the Dot with the added information.
For Android users, the interface is slightly different:
- On the Android device, you will see a Blue Dot in the centre of the screen.
- Navigate the Dot to the specific area or item within the room where you want to add details.
- Once you have positioned the Dot in your desired area, press on the blue Dot. A popup screen will appear.
- In the popup screen, enter the Description, adjust the Condition Slider, add Comments, select Tag icons (up to two), and add multiple images to the Dot if needed.
- Save the Dot by following the prompts in the app.
Following these steps, you can easily add Dots to your images in the Dotin app, providing detailed information and enhancing inspection reports.
Attention
Please note that the Description field is mandatory when adding Dots, and you must fill in this field to save the Dot. Ensure that you provide a description for each Dot you add.
If you need to edit a previously added Dot, click on the Dot within the image, and the popup screen will appear again, allowing you to make changes or add additional details.
Taking the time to provide accurate and detailed information in your Dots will enhance the quality and usefulness of your inspection reports.
Tags within Dots
Unlock a visual snapshot of Dots with selectable icons. Choose from 16 options or add custom tags for a comprehensive overview of your reports. Simplify, streamline, and amplify your property inspections.
- When you are on the Dot screen and have filled in the necessary details, scroll down to the section below the Comments field.
- By default, the section will be set to “None.” Click on this field to open a popup screen.
- In the popup screen, 16 different tag icons are available for selection.
- Select up to 2 different tag icons that best represent the nature or category of the Dot you are adding.
- The selected Tag Icons are great at giving you an overview of Dots within your reports.
- Choose from the available options to simplify, streamline, and amplify your property inspections.
- Additionally, suppose you don’t find a suitable tag icon among the provided options. In that case, you can add a custom tag description to create a comprehensive overview of your reports.
By utilising tags, you can enhance your inspection data’s visual representation, making identifying and analysing critical aspects within your reports easier.
Syncing Reports
Experience faster turnaround times with our Sync Manager. Seamlessly upload and download up to 4 reports simultaneously on the go while smoothly continuing your inspections. Maximise efficiency without missing a beat!
Syncing Reports Guide:
1. Report Screen: After making edits to your report, you will see a Sync button appear on the Report Screen. Click on this button to initiate the syncing process. The Sync button ensures that your latest changes are saved and updated.
2. Inspection Screen: Another location where you can find the Sync button is on the Inspection Screen. This screen provides an overview of all your inspections. Locate the specific inspection you want to sync and click on the associated Sync button. This action ensures that any changes made within the inspection are synced and saved.
3. In Progress Screen: On the In Progress Screen, you will notice that unsynced inspections are marked as “Draft” and highlighted. Next to each Draft entry, you will find a more icon (represented by three dots or an ellipsis). Click on this icon, and a menu will appear. Select the Sync option from the menu to initiate the syncing process for that specific inspection.
By syncing your reports, you ensure that all the latest changes, additions, and updates are saved and reflected accurately in your inspection records. The Sync button is a convenient way to update and synchronise your data across different sections and screens within the app.
Attention
To ensure the safety of your data and prevent any loss of information, please follow these guidelines when using the app:
- Sync Reports: After finishing an inspection and adding all the required details and information, always remember to sync the report before proceeding. Syncing ensures that your data is securely saved and backed up.
- Avoid Completing Without Syncing: Do not press the Complete button before syncing your report. Make it a habit to sync your report first to ensure that all the latest changes are included in the final version.
- Avoid Canceling Without Syncing: Avoid pressing the Cancel button before syncing your report. Cancelling without syncing may result in losing any unsaved changes or data.
- Sync Before Signing Out: You must sync all your reports before signing out of the app. Check for any reports marked as Draft and ensure they are synced and completed before proceeding with signing out. This ensures that your data is properly saved and accessible when you return.
By following these guidelines, you can maintain the integrity and security of your inspection reports, prevent data loss, and have a smooth experience using the app.